Showing posts with label Mini Album. Show all posts

Sunday, September 16, 2012

#97 Artiste Mini Album

I made this mini album using ONLY the ARTISTE Cricut Cartridge!


Hi everyone! I made a mini album just using the wonderful Artiste Cricut Cartridge for every single cut here including the actual book shape and pages! I used cereal box chipboard to make the book sturdy. 
Here's a list of Close To My Heart Products Used:

This is my first time posting a Youtube video and it is really blurry and fuzzy I don't know what happened :(


Wednesday, July 11, 2012

#57 Universal Studios Autograph Book


Hi everyone! I feel like I haven't posted a project in forever, I guess I was having too much fun over the holiday. I had a great time, we went camping at the beach here in Southern California and it was gorgeous baby Olivia did pretty good I think she slept more than us LOL!

Here's my project I totally forgot to post shhhhh I feel like a bad blogger sorry Monica ;)

This is a mini album autograph book I made for our recent trip to Universal Studios Hollywood for my son.  All of the cuts are from the Silhouette Store. I just cannot believe how many characters we saw there all in one day! We saw 2 of the Transformers characters Optimus Prime, Bumble Bee, and also Curious George, Spongebob, The Simpsons crew, Dracula, The Mummy characters,  Beetlejuice,  Shrek, Fiona, Dora and the Lorax! 

Please be sure to link up your "ANYTHING GOES" project over at  our CAMEO CREATIONS challenge to win a $10 gift card to Michael's woo-hoo!!! 

Thursday, August 11, 2011

#183 Crafty Sprouts Stamps Sneak Peek

**Click HERE for the 2 day Birds and Birdcages Blog Hop that I am hosting**

Hi everyone!! I am so excited to share with you the sneak peek from Erika's Crafty Sprouts NEW stamp line!!! For my project I got to preview the TEXT TALK stamp set which has some really cute sentiments and even a Smart Phone!! I used 3 of the stamps LOL, Call Me, (Anytime)

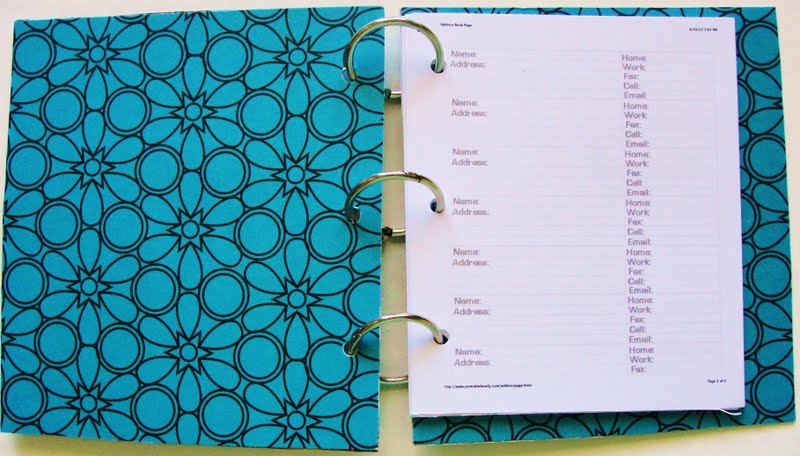
I made a phone & address book from a Cocoa Pebbles cereal box yum, love that cereal it's like a bowl of chocolate LOL!  The paper is from DCVW All Dressed Up stack. The phone is from the From My Kitchen Cricut  cart and the stamp is called Cheeky Chat from The Greeting Farm Stamps. The best part of all I added tons of bling and stickles to the phone!! I got huge bags of larger bling pieces from the Dollar Tree for $1!! I bought 5 bags LOL, gotta stock up!

I colored the stamp with Zig markers and added Stickles and pop dots!

Here's the inside of my phone book, I found the address book pages for free online and printed a total of 8 of them. The total size of my phone book is 5x5.5 inches.


Giveaway!! Please be sure to check out Crafty Sprouts Stamps and leave a comment on both of our blogs to qualify for this Text Talk stamp set! The stamp quality is amazing nice clean stamp images!

Also,  These stamps will be available for pre- order along with 3 other sets starting on Friday 8/12! HERE

Saturday, July 2, 2011

#166 Explosions Everywhere Blog Hop

Hi everyone welcome to the Explosions everywhere blog hop hosted by ERIKA and ZENI if you just arrived here from Gaby's blog then you are in the right spot. This blog hop is all about exploding boxes that can be a mini album or a gift box! I was super excited when they asked me to join because I have been wanting to make one of these for ages LOL! Here's a link on the tutorial I used to make this album HERE.

For my exploding box I decided to make a mini album to showcase some of our pictures from our camping trip which was actually last weekend! I know it's a big miracle that I actually got my pictures printed out that were so recent.... BTW Walgreen's is having a sale right now all 4x6 photos are only .9 cents!!

Anyways, this was our first time ever bringing our son camping it was a short 1 night stay at a campsite close by it was a trial run to see how he would do and he passed the test, maybe next time we camp we will try 2 nights!

Now onto my album..... All cuts were from Campin' Critters Cricut cart I was so proud of myself for using 9 cuts... yep 9! The paper stack I used was from a 2009 DCWV release called "The Green Stack" 70% recycled paper.  The face stamps I used were from Peachy Keen Stamps called BIRD FACES AND MORE which I think was a great price and you can mix and match the face pieces, you will see below I used these for a bear, an owl and a duck. The smore face was from PKS Everyday Paper Dolls.

 Top View
View looking in from above.
Opened completely
1st layer, each section is 3.5x2.5 inches
Also 1st layer. I stamped all faces with PKS Bird Faces and More, and Smore face is from PKS Everyday Paper Dolls. I chalked the smore marshmallow with black chalk to make it look like a real cooked marshmallow.
2nd layer, each piece is 3.5x3 inches. These signs say "Camp Sweet Camp" and "Notice Bug Spray Required".
Also 2nd layer here these signs say "Happy camper" and "Love to Camp"
I placed an Action Wobble underneath the tent. This tent isa about 3x3 inches and was pretty easy to make. This was my very first time making a 3D pop up item from a Cricut cart and I love the way it came out and so does my son! He keeps asking me to go camping and pointing out where we slept in the tent it's so cute!
Blog Candy!! I am giving away this set of epoxy stickers from Me and My Big Ideas to one lucky follower, just leave me a comment and I will announce a winner on Wed. July 6th.

Thank you to www.scrapbooksteals.com for sponsoring our awesome hop!

Have fun hopping everyone, and have a happy safe 4th of July!!

NEXT STOP is ROBERTA

Friday, May 13, 2011

#130-131 Friday the 13th Blog Hop


Thank you to ELSA CRICUT LVR for making this amazing blinky!!

Welcome to the Flaunt It Friday's Friday the 13th Blog Hop hosted by Sandra! This is a fun, cute and spooky hop where we will be featuring the Happy Hauntings Cricut Cart. We are so sorry that this is up way late because of problems all day posting with Blogger, and we are aware of some missing links in the hop so be sure to keep checking back when you can!

For this week's challenge we are asking you to use the HAPPY HAUNTINGS cartridge and the cut choice this week is the FRIDAY THE 13th phrase on Page 54! You can create anything you want and for an extra challenge try to challenge yourself to create something different from last week's project. If you do not own this cart feel free to use any similar cut from any cartridge, you have one week to enter the challenge. 

For my first project I made a layout just for today! I have to admit I don't think I've ever took any pictures on such a spooky day! I stamped the sentiment on this Tim Holtz tag with Fired Brick Distress ink and inked it up I think it looks bloody! I also punched some borders with my MS Drippy Goo Punch. I made a little Jason doll with my Gypsy and the hockey mask I made using the Blackletter "Free" Gypsy cart and got the circles from Plantin Schoolbook. The body, gloves, ax, clothes and shoes are all from Everyday Paper Dolls. I also added some blood to the ax and used my chalks to give his clothes a dirty look. I embossed the photo mat with my woodgrain embossing folder and inked it up and added some buttons. Isn't this paper so perfect for this theme!! Luckily I found it hidden in my stash of papers and it's from Rusty Pickle. The phrase is from Happy Hauntings and I added pop dots underneath

Here's a close up  of my masterpiece LOL!
Now onto my 2nd project which is a mini album made out of coffee filters!!  My 2nd cut choice from the Happy Hauntings cart was the large pumpkin with a curly vine. All papers and embellishments are from K & Company.


The title says "Aidan's 1st Pumpkin Carving" and is filled with the "extra" pics that are leftover from my scrapbook layouts, a good way to use more pictures instead of just having them sit in a box. I used drippy goo punch for the green slime, used my branch punch around the title and embossed the pumpkin. The letter's are from Tim Holtz Typset die. I also added some stickles to the pumpkin vine and added several pieces of ribbon.

Page 2 and 3 I punched each photo mat with the cracked branch punch from Martha Stewart and also added a pumpkin border.


Page 4 and 5 I stamped all faces with Peachy Keen stamps which I used Pumpkin Faces, and Pumkin Face Assortment and Monster Faces. Yes that picture is of me and my son when he was only a 1 year old!

Page 6 and 7 I also embossed all large pumpkins with my woodgrain embossing folder in my Cuttlebug. Isn't he cute! He was so little LOL! The little owl was a piece of patterend paper that I cut out.

Page 8 and 9 here's our final pumpkins...can you guess which one was mine? I made the skull pumpkin and my hubby made the ugly man face haha! I also carved my son's little baby pumpkin!

Back cover more green slime and I also stamped both sides of all of the pumpkin tags. Here's a little pumpkin monster that I also cut from patterned paper.

I cut all tags from Sweet Treat, and all pumpkins from Create A Critter.

On this side I wrote cute pumkin poems on all of them which I found online, and did my journaling on one of them.


Here's the Master Hop List:
1. Flaunt It Friday's www.flauntitfridays.blogspot.com
4. Lisa P. http://www.crop-and-create.blogspot.com/ 
5. Corri http://www.buglvr.blogspot.com/
6. Monica http://simplycricutting.blogspot.com/
7. Celeste  http://ccscards.blogspot.com/  
8. Carley http://www.the-real-icarley.blogspot.com/
9. Laurel http://www.blog.littlepeaceofmyheart.com/
10. Deborah www.bugjuiced.blogspot.com
12. Mel http://scrappymel.blogspot.com/
13. Yolonda http://www.craftyscentiments.blogspot.com/
14. Jess http://myscrapdiary-jess.blogspot.com/
15. Brynn http://flairandfrillscreativity.blogspot.com/
Since we are behind we are giving you an extra day to finish the hop, all winner's will be chosen on Tuesday 5/17


To win the Grand Prize which is one Peachy Keen Jack O Lantern Face  Assortment sponsored by Peachy Keen Stamps all you have to do is enter our Friday the 13th challenge! Just link your project to the Flaunt It Friday's Blog and Leave me a comment. You do not have to be a follower but I would really love it if you did!

NEXT STOP is SHARON

Monday, May 9, 2011

#124 MPS NSD #5 Robot Mini Album


Hi everyone, I back again! This time it's for MPS NSD challenge #5 which is 3D Art. I decided to make a quick an easy mini album using a 6x6 circle chipbord album from the $1 bin at Michael's. All of the paper and embellishments are from a Robots page kit from Joann's. I cut each circle out from Plantin Schoolbook, and sprayed with Glimmer Mist and embossed with my Cuttlebug.

Saturday, April 23, 2011

#103 Disney Easter Egg Hop- Mini Album

Gif Created on Make A Gif

Hi everyone!!! Welcome to the Disney Easter Egg Hop hosted by my sweet, talented and fellow Disney freak like me...... MONICA!! I was so excited when Monica asked me to help Co-Host this fun Hop because she know's how much I love Disney! I would like to thank ELSA for making this super cute hop button, thank you Elsa!

For our Disney Easter Egg Hop our theme was Anything Goes just as long as it's Disney and Easter, pretty cute combo if you ask me! Some of us will be posting on both days SAT/SUN so be sure to stop by again tomorrow.

Now onto my project! I made an Easter mini album for my son Aidan (age 3), he was so happy that I let him pick all of the cuts it's pretty funny that he didn't want Minnie Mouse or Daisy LOL, he chose all of the boys! I made this so I can place just pictures of him and his other little cousins on Easter this Sunday. I wanted it to be an "All Kiddie" mini album I figured that it would be nice for him to look at and see other little kids which are his family.

This is the front cover, I made the entire mini out of one 12x12 sheet of blue textured cardstock. I just played around with the folds and this is what I came out with. I didn't plan on making a mini I actually made a pre-made 2 page layout with these same exact papers and I just didn't have the vision since I normally do not make pre-made LO's. I feel like I need to have my pictures in my hands since I like to crop them a lot. I scored the 12x12 paper at every 3 inches to make 4 sections and scored down the middle at 6 inches. The font is from Robotz cart, and I made my own book binding with a sheet of patterned paper cut at 2x6 inches and folded in half. All papers are from SEI.

Here's what the back and front covers look like. You can also see the bottlecap I made on the left side.


For this bottlecap Idea I orginally saw an epoxy maker at the scrapbook expo in Anaheim and Monica gave me this idea to use Glossy acents instead to save money...thanks Monica!! Well I actually stamped Pluto (my son chose!) and colored him with Bic Markers and placed the paper in the UTEE Melting Pot, then I hammered down and distressed with a Meat mallet!! Yes a kitchen tool! Well I just discovered that I can use that instead of pounding chicken, it has been sitting in my kitchen drawer for years waiting to be used LOL! I added twine behind the front and back covers as a closure and punched a whole in the bottlecap with my Crop a dile.

Here's the first 2 pages all cuts are from Mickey and Friends cart, the bunny ears are from 3 Birds On A Parade, and all stamps are Pink By Design. I also did faux stitching all all pages.

To create a circle opening I just punched a half circle with my 3inch circle punch. For the triangle opening I just folded over the paper.


I cut these tags from Sweet Treats and added some Spring looking ribbon. This is where I will place the photos and I also have the option of placing anywhere from 4 to 12 wallet sized photo's in this mini if I use all empty spaces.

BLOG CANDY!!! I am giving away a set of Peachy Keen Stamps CUTE AND CUDDLY to one lucky follower. To qualify you must be a follower and leave me a comment on both posts, be sure to check out my new Disney project tomorrow! I will announce a Random winner on Monday.


Monica: http://simplycricutting.blogspot.com/
Sandra: http://365daysofcricut.blogspot.com/
Elsa: http://www.cricutlvr.blogspot.com/
Carley: http://the-real-icarley.blogspot.com/
Norma: http://pinkblingcrafter.blogspot.com/
DD's Crafts:http://craftydeb-ddscrafts.blogspot.com/
Nicole: http://www.creationsbymommy.com/
Glora Jean: http://glorascrafts.blogspot.com/
Janis: http://pausedreamenjoy.blogspot.com/ 
Lauren: http://laurenscreative.blogspot.com/
Melissa: http://disneydreamerdesigns.blogspot.com/
Scraps to Treasure: http://scraps2treasure.blogspot.com/
Theresa: http://www.thescrapbookingqueen.com/
Olga: http://www.threebutterflykisses.com/


Have fun hopping and have a wonderful Easter!
NEXT STOP is ELSA

My Highest Viewed Video

 Please come and support my YouTube channel and watch my highest viewed viewed video and subscribe! https://youtube.com/shorts/4gZ1h0N7sP8?f...