Showing posts with label Stickers. Show all posts

Monday, February 11, 2013

#24 Olivia's 1st Easter Layout

Hi everyone! Here's a layout I made of my daughter's 1st Easter can you believe it's already going to be a year next year I can't believe it! She was so tiny since she was born 3 weeks early that I put her in this little Easter basket! I got the cute little baby chicks, Easter eggs and peeps from KaDoodle Bug Designs "Close Your Little Peepers" pattern cut out with my Silhouette Cameo.  The alphabet stickers are foam stickers from American Crafts and all of the papers used are from the new Spring/Summer 2013 Close To My Heart IDEA BOOK. The paper is called the Chantilly Paper Pack along with some flowers & "Your Perfect" shape are from the Chantilly Complements Dimensional Elements (Chipboard Shapes). I cut the banners out using the Birthday Bash Cricut Cartridge.

Chantilly Paper Pack comes with 12 -12x12 sheets of paper!
Chantilly Complements Dimensional Elements

Other CTMH products Used:


If you would like to take advantage of the sale I'm having right now I am offering a $5 refund for every $50 you spend in my CTMH online party just click "JOIN". If you have any questions before placing your order please email me at critterbugg365@gmail.com


Wednesday, February 29, 2012

#32 Easter Peeps Layout for SVG Attic DT Day


Happy LEAP DAY!!!! It's SANDRA here and for this week's project  I made  a pre-made layout for this year's Easter pics, especially after seeing these super cute cuts from the NEW set called EASTER ELEMENTS by SVG ATTIC I could NOT resist using this set ASAP lol!

The patterned papers I used here were actually from a set I got from the $1 bins at Target last year these papers are teenager themed but I think they worked out good with my Peeps! The stickers I used are thick glitter foam stickers from Creative Imaginations. I also added green pastel ribbon, pearls, purple Martha Stewart glitter and sprayed everything with "Yellow Daisy" Glimmer Mist, I just love the shimmer on the peeps in the pic above.

I cut everything here including the bunny and chick peeps, and also the butterfly with SCAL 3 and my Silhouette Cameo.

Be sure to check out my post's and the rest of the DT's daily posts for inspiration HERE on the SVG Attic Blog, along with our new color challenge!

Here's the set I used Easter Elements

Monday, February 13, 2012

#27 You Light Up My Life Blog Hop

You light up my life
You give me hope
To carry on
You light up my days
and fill my nights with song

Jearise from Lorby's World is our hostess for today's hop which takes a look at all those things that light up our lives be it a significant other, children, place or pets. Enjoy what they have come up with as you hop along and please leave a comment on each blog to light up their life today. Some may be giving blog candy away so keep an eye open to see and you never know...You're life may be lit up.

BLOG CANDY
Leave a comment at Lorby's World and become a follower (or let her know if you already are one) to be eligible to win a $10.00 gift card to Joann's Crafts and Fabric.

SPONSOR and more BLOG CANDY
SVG ATTIC is sponsoring this hop by giving away a $20.00 gift certificate to their store. SVG Attic is the last stop on our hop and to qualify for the gift certificate you must do two things. 1. Visit the SVG Attic Store and then 2. Become a follower of SVG Attic's blog and leave a comment telling which svg file from the store you like best.


If someone turned off the lights and you ended up here by accident, please follow the lighted path as you begin your hop at Lorby's World .If your hop stayed lit, you should have ventured over from JANET http://ladyluvbug.blogspot.com/ and will continue on to JESSICA http://thecrafterscottage.blogspot.com/.
Lights on....


There are so many people who light up my life.... my hubby, my son Aidan, my 2 little dogs, and the little Princess I have growing in my tummy (who arrives in April!). But I had to make a layout with a great picture that I had on hand, so here is a picture of me and my son I just love smothering him with hugs, kisses and all my love! I never understood why so many people loved being a mom until I became one myself to this little man 4 years ago, I love you Aidan!!!!

I made this layout using my Silhouette Cameo and found the 4 lamps and marquee shapes in the Silhouette store they are all Lori Whitlock files. For the title I used some glitter stickers, I also added a large Prima flower with some large grey buttons. I added yellow Stickles to all of the lamps.

NEXT STOP is JESSICA

Saturday, February 11, 2012

#24 Tiny Turtles Layout

Hi everyone! I have been very determined to finish my 2010 Scrapbook album before my baby gets arrives in April, I just can't believe how long it's taking me... I guess because last year I made so many cards and not enough scrapbook pages! Well that is all going to change since my New Year's resolution was to make way more layout then cards this year I think I am doing good so far lol!

I made this layout to feature our tiny pet turtles that we got in 2010, they were about 2 inches or less each and now they have grown so much, they are the size of the palm of my hand, it's pretty neat watching them grow and swim around in their tank.

I used the Life's A Beach Cricut cartridge for the turtles and pulled out all of my "chocolate" colored supplies so I can enter in Amanda's Crafts and More Challenge which is "chocolate" themed. I used chocolate colored cardstock, ribbon, twine, glimmer mist, buttons, flowers, marker, and stickers! I also embossed the turtles with my Cuttlebug and added some pearly bling. 

Wednesday, June 22, 2011

#158 Scrappy Moms Sneak Peek 4, Watermelon Layout and Hop Winner!!


Hi everyone I hope you all are having  a great day! I was so excited when I saw that Cooking with the Cricut was having a watermelon challenge, so I decided to make a pre-made sb page for pictures of my son eating watermelon last summer. I am so bad at getting my pictures printed out right away and I usually don't make a lot of pre-made pages, I guess I forget that you can do that LOL! 

For the background paper I used Kraft cardstock along with.......Christmas Paper!!! Yep! I can't believe I  was able to pull it off! I was scared to use Christmas patterned paper  at first, but then I thought it would be genius since a watermelon is naturally green/red and white. This Christmas paper is from the American Crafts Christmas stack that I got at Tuesday morning for less then $5. The watermelon cuts are from Simply Charmed and these ants invading the page are from Kate's ABC's. The title Mmmm is from Graphically Speaking, along with American Crafts  alphabet stickers. I stamped the "Juicy" watermelon with Scrappy Moms Stamps GOOD EATS which is my 4th Sneak Peak as a Guest Designer.  which is my  faces on the melons with PKS Boy Mates, and stamped the ants eyes with PKS Everyday Paper Dolls. For a final touch I added white rick-rack and did some REAL stitching with my Sew Easy!! 

I have to thank Marianne from Facebook her blog is Paper or Fabric Crafter she was so sweet and sent me a RAK which was embroidery floss for my new Sew Easy, I used a dark green color here for the stitching. Thank you so much Marianne!! That was so super nice of you, I felt like it was Christmas!! Make sure to check out her amazing talent HERE

Now onto the Cupcake Birthday Blog Hop Winner..... Becky Dunham!! Congrats Becky! Please email me at critterbugg365@gmail.com

Wednesday, June 1, 2011

#143 Train Layout


Hi everyone! I am so excited to be able to play in another Throwback Thursday Challenge and this week's challenge is to use green and yellow with any older cart. I took Aidan to Toys R Us back in November for a Thomas the Train Playdate and that's what this layout is all about. The older cart I chose was Joys Of The Season!!! I love when I can create a non-seasonal project with a seasonal cart!! The train is from JOTS and I added some black buttons as the wheels, the title is all stickers and I also did some stamping with the stars and also the "What a Day for a Daydream" sentiment.

Saturday, November 20, 2010

My Thanksgiving Blessings Blog Hop Mini Album

Welcome to 365 Days Of Cricut and the MY THANKSGIVING BLESSINGS Blog Hop! If you've come from visiting Susan at Its me Susan P, you're in the right place!


If you've just happened across my blog and would like to play along with our fun hop, you can go to INKING IT UP CRAZY and start at the beginning. Go to Inking it Up Crazy.

The theme of this blog hop is MY THANKSGIVING BLESSINGS. Each blog has created a project centered around the blessings they have had this past year. Be sure to visit each blog for inspiration and fun BLOG CANDY.

***Warning Picture Heavy***
I decided to make 1st EVER mini album for our hop, I am going to put up to 8 pics of my son and I, I am going to put pics of us and our pumpkins pre-carved since this is not a Halloween album, Thanksgiving pics, Thanksgiving food pics Yum! Also, I will take a pic of us in our front yard next to our tree once the leaves turn red.  I named my album "Autumn Blessings" I have been wanting to make a mini for years but I have been so chicken to make one, I don't know why I just thought they were very intimidating, then about 6 weeks ago I saw all of these 4x4 inch Coaster sets on clearance at Michael's for only .20 cents! I thought I can do it, so I did. I am extremely happy with the end result, I love it so much I can't stop looking at it, and of course my 3 year old son loves it, he thinks it's his and he keeps saying "Wow" "Wow' "Wow"! I love him so much he is my #1 fan! I cheated on my Cricut and did this entire mini WITHOUT MY CRICUT!! I know I feel so Guilty LOL!!

Page 1: I stamped 2 images and I embossed one with gold embossing powder, the flowers are Recollections and Primas, the leaf is from the jewlery section at Michaels, the small yellow butterfly charm is a cell phone charm that I bought from ebay. "Autumn" is a brad. "Blessings" is a metal embellishment from Michael's I added pearls to it.


Lots and Lots of ribbon, just the way I invisioned my 1st mini! I know it may seem messy, but I love it so much  and I am obsessed with ribbon, so I got to use a lot of my stash!

On every page I used my Zutter Distrezz it all to destress the sides and I inked all of the edges with Walnut Stain and Frayed Burlap Distress ink. Love them!

I thought this view was just stunning! You can see the top page and also my distress work.
Page 2 and 3: Left side I put cute scarecrow ribbon and Glimmer Mist. Right side glimmer mist, cut paisley shape from patterned paper, flowers, sticker and pearls....oooh la la I love pearls and all things girly!
 Page 4 and 5: Left page I stamped mesh background stamp, put red yard on the side, cut the scarecrow from my paper stack adhered to cereal box to make a tag, added a flower eyelet with my Crop a dile. Right side put a sticker and something from a fake flower bouqet from the $1 store
 Continuing....Left side I sprayed the flower w/ Glimmer mist added a very large gem, stamped the leaf and added ink to my tag.
 Page 6 and 7: Left side sprayed 2 colors of Glimmer Mist and added a Sticker. Right side Did some stampinkg, added ribbon and plenty of turkey and leaf stickers, also added a flower and brad. I made that leaf charm.
 Close up of my handmade charm. It's a Tim Holtz tag/charm from Michael's added twine, cut the leaf from patt. paper and glued together with Glossy Accents.
 Page 8 and 9: I didn't do too much here because i wanted to put a large pic on the left side. I just added a flower, pearl and ribbon. The Turkey paper  was in my paper stack.
 Page 10 and 11: Left side sprayed with 3 colors of Glimmer mist (my only3), the border with the leaves and acorns are a piece of ribbon. Right side is just stickers. For this page I plan on puttig a pic of our Thanksgiving meal.

Page 12 and 13: Left side is a pumpkin ribbon, plan on putting our pic here with out pumpkins, Right side is a silk flower also from the $1 store inked it up, added a cloth thype brad, pumpkin sticker, journaling tag, ribbon and another embellishment that I made with  a cereal box. I just put paper that says "Pick Your Own Pumpkin" inked it and on the back put pumpkin stickers...see below
 Here's my embellishmet and plus you can see the pretty ribbon and the pretty leaf paper.
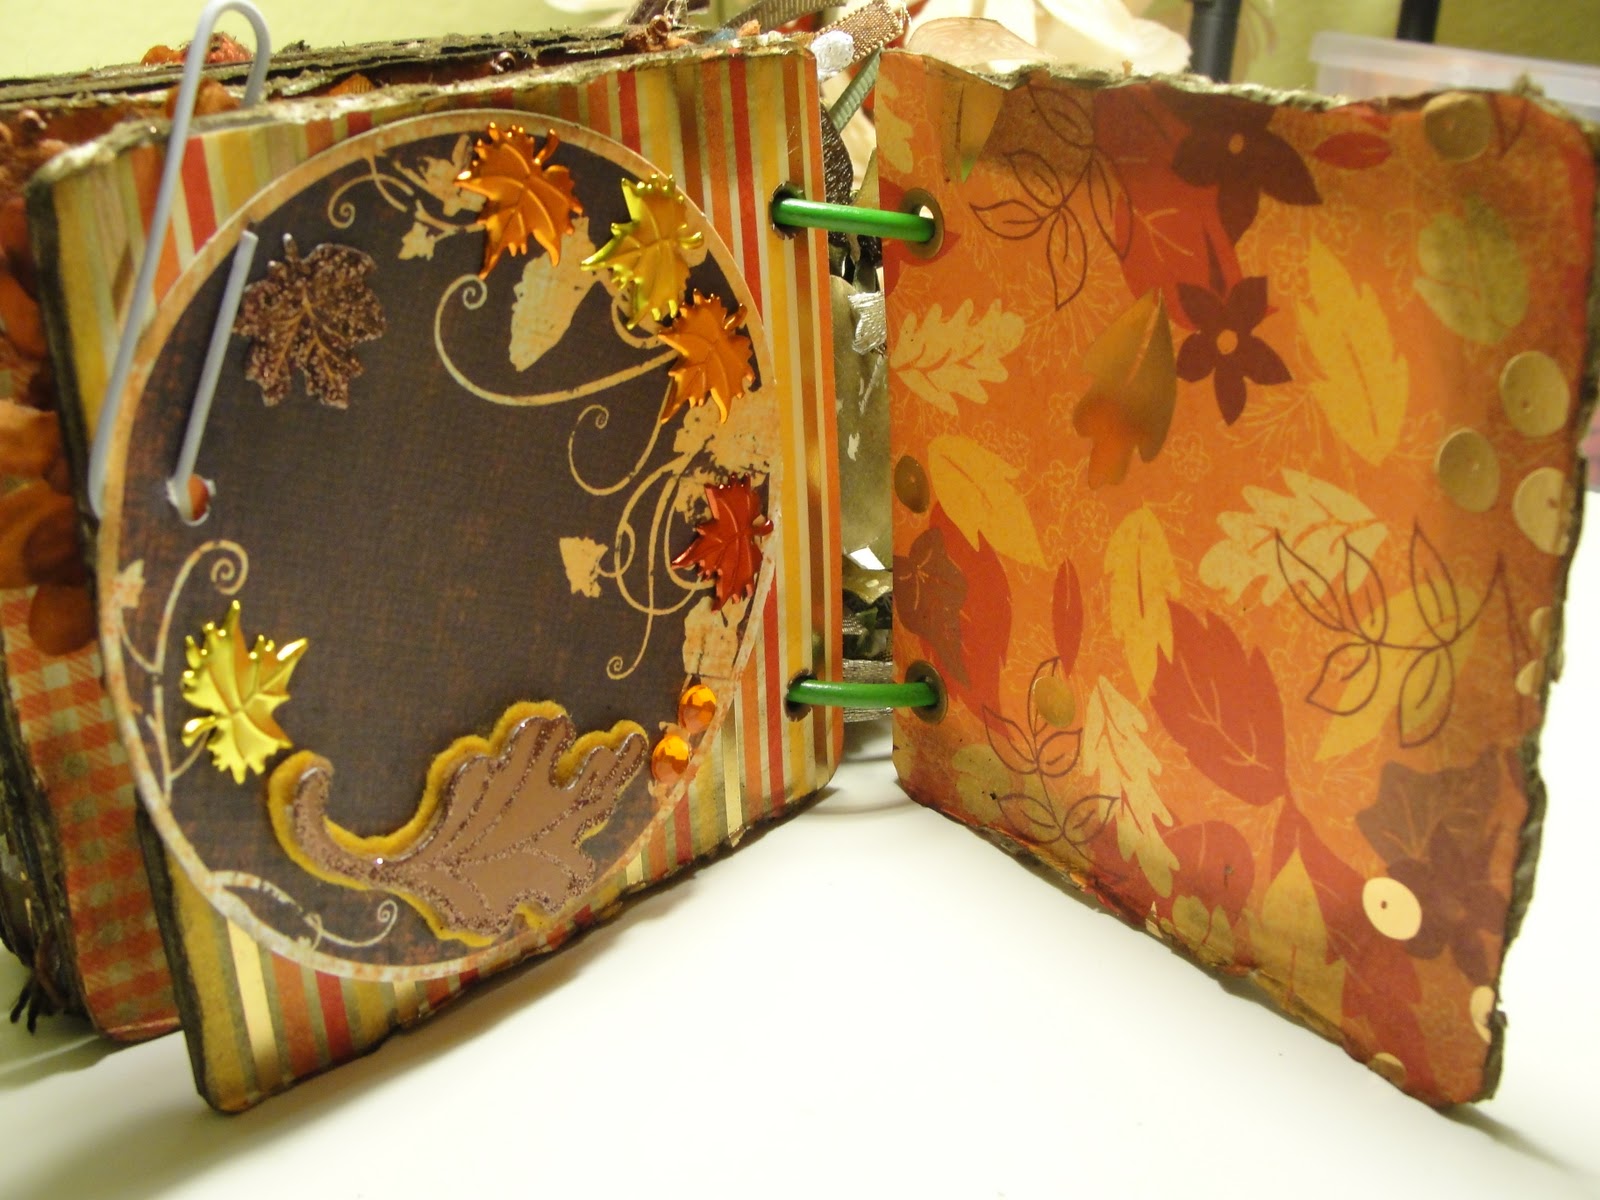
Page 14 and 15: Left side added a paper clip, a circle punch out shape from my Mind's eye (I bought at a LSS) it's a sheet of paper with die cut punch outs. I put 2 leaf stickers, bling and leaf brads which I love. I plan on doing my journaling on the circle. Right side I left plain so i can put a pic.
 Here's what it looks like when you swivel it open. I can add a bonus pic here behind the circle.
Page 16 last page: This was also an easy page just cut it out from my patt. paper stack ready to go! I also did more inking here. and you can also see wha the ribbons look like from the back side.
 BLOG CANDY!!! Yep, I decided to make a mini album kit for one lucky winner!! I tried to give you everything that I used to make the mini, but some items I did not have duplicates of. You will recieve one 8 piece THICK chipboard coaster set, 2 large binder rings, pretty  paper from the Autum Splendor Stack (Michael's), so much ribbon for you, brads, flowers, all the charms I used. If you win and you decided to make this mini I would love to see your version of my mini, have fun creating!
Theresa- http://www.juicycricutcards.blogspot.com/
Jenny- http://www.crazyaboutcricut.blogspot.com/
Celeste- http://www.ccscards.blogspot.com/
Raven- http://www.love4stamps.blogspot.com/
Rebecca- http://www.creationswithbecka.blogspot.com/
Debbie- http://www.craftydeb-ddscrafts.blogspot.com/
Sherri- http://www.sherrisspace.blogspot.com/
Susan- http://www.itsmesusanp.blogspot.com/
Sandra- http://www.365daysofcricut.blogspot.com/  ---You Are Here---
Kathy- http://www.kathyand3kids.blogspot.com/ 


I guess I am not the only one who is obsessed with my Cuttlebug! My dog Boots was just passed out asleep laying there in my Cuttlebug drawer, yep I have a 12x12 drawer full of embossing folders! I highly recommend Cuttlebug folders to be a dog pillow LOL! Too funny!

To win this awesome mini album KIT  that I have created for you to make all you have to do is leave me a comment here and tell me what you have caught your dog/cat doing in your creative space! You do not need to be a follower, but I do really love all of my current and all new followers are welcome here! Please like me on Facebook so we can stay connected there also! I will choose a random winner on Monday November 22nd. Have a great time hoping now on to Kathy.

My Highest Viewed Video

 Please come and support my YouTube channel and watch my highest viewed viewed video and subscribe! https://youtube.com/shorts/4gZ1h0N7sP8?f...