Tuesday, November 30, 2010

#195 Twinkle Toes Lola Doll

***Click HERE for my Peachy Keen GIVEAWAY at my new blog Flaunt It Fridays***

Hi everyone I am so excited to share with you this card I made last night with the really cute Walmart cartridge called Twinkle Toes. I LOVE making Paper Dolls and this one was my favorite from Twinkle Toes, I love the way she looks, maybe I just love her hair LOL! I have even named her the Lola Doll, doesn't she look like a Lola!?!

Kassidy from Inking It Up Crazy has been so sweet to her Fall DT, this will be our last project for the Fall Term =(. The good news is that she let us make anything for our final project so I thought I would make a doll and use my favorite PK stamps the princess set.

The heart and my "Lola" doll are from Twinkle Toes, I stamped the face with PKS, stamped the sentiment. I also put Stickles on her shoes and bows, for the bows I added some big bling and I put white puffy paint on her belt and collar, I also used my border punch to make the borders. I am also entering My Sheri Crafts HELLO Challenge. Have a great crafty Day and don't forget to stop by Flaunt It Fridays  for the Peachy Keen GIVEAWAY!!

Monday, November 29, 2010

#194 Christmas Carol Inspired Card

***Click HERE to see my NEW Challenge Blog***
***Click HERE to see my Hello Kitty Layout***
Hello everyone happy Monday! You know what that means time for a new and exciting challenge at Paper Playtime. This week our fun challenge is CHRISTMAS CAROL INSPIRED so that means you can make anything from a Christmas carol. I decided to use my new Jolly Holidays cart and make a goofy looking snowman since I think the one on Rudolph the red nosed reindeer looks goofy LOL! I love this snowman from Jolly Holidays, he has a big huge head so I had to use my biggest Peachy Keen stamp I could find. I also added stickles to his pipe, stamped the sentiment, added ribbon, buttons and a border snowflake punch.

Sunday, November 28, 2010

#193 Hello Kitty & Bling!

***Click HERE for my NEW Challenge BLOG***
Scroll down to see my other 2 post from today
I love Hello Kitty and Bling!

I love this tree, it was very time consuming but worth it!

Hello everyone I can't believe this is my 3rd post for today, I am feeling extra creative especially since I just got my Gypsy back. I guess I was having major withdrawls because I have been making so many fun things!

Here's a pre-made layout that I did to put a pic of myself and my 3 sisters at christmas time. I haven't decided if I will put this years photo or one from the previous years.  The tree, sentiment and of course Hello Kitty are all from Hello Kitty Greetings I just blinged everything out just the way I like it! I even chose blinged out snowflake paper (you can't really see the glitter). For Kitty and the sentiment I put Stickles, and for the tree I put MS glitter, buttons, brads, bling, eyelets and pearls. I saw this idea for the tree in Creating Keepsakes magazine from last year's christmas issue. Towards the bottom of the page I put 2 strips of patterened paper and also 2 strips of pink ribbon. I am entering in a few challenges here:
BBTB2 Hello Kitty Elf
Sentimental Sunday's 3 papers, 3 buttons & ribbon
The Studio Challenges Sketch & Monochromatic (I chose PINK)

Thank you for checking out my new Cricut Challenge Blog Flaunt it Fridays our first challenge will be on Friday Dec. 3rd!

#192 Thanksgiving 3 Birds on Parade

****Come check out my new Cricut Challenge Blog Flaunt It Fridays****
***Click HERE to see my earlier post from today (Jolly Holidays)

I made this cute little birdie card from one of my favorite cartridges 3 Birds on Parade I love that cart! I stamped his little face with a Peachy Keen stamp, stamped the sentiment, added some buttons and twine. I also did a little faux stitching and added bling with my i-rock. The two background shap/tags are from Once Upon A Princess. I am entering into my friends Gaby and Abby's challenge this week which is Thanksgiving. Be sure to come play along you only have a few more hours! Click HERE for their challenge.

#191 Jolly Holidays Card

Hello everyone! I am so excited to share my first Jolly Holidays card from the Walmart Exclusive cartridge. Let me tell you I went through a really hard time getting this cart it only took 4 try's LOL....seriously! Since I went through so much drama getting it I plan on using it as much as possible!

I cut the skunk and candy cane from Jolly Holidays and stamped the face with Peachy Keen Stamps, I used punches for the corner frame, and also for the border. For the sentiment it is actually a piece of patterened paper from DCWV 180 stack from Joann's (great idea huh!) I then added some twine across the card.  I am entering in the Paper Cutz Challenge which is ANYTHING GOES!

Please be sure to come check out MY new Cricut Challenge Blog Flaunt It Friday's for a PEACHY KEEN ***GIVE AWAY***

Saturday, November 27, 2010

#190 Gingerbread Card

***Click HERE to see my NEW Challenge Blog FLAUNT IT FRIDAYS ***


Hi everyone I am so exited to be back in my scrapbook room. I had to send my Gypsy in to get repaired last week and I have been so lost without my Gypsy. They sent me a brand new Gypsy and I just got it last night, I am so happy to have a Gypsy again! For some reason it did not download Smiley Cards did this happen to any of you?

Here's a card I made with the Gingerbread Seasonal cart I think it's adorable and I am really craving Christmas cookies now LOL! I let my 3 year old son help me make this he was such a good helper and he now thinks this card is his LOL! The gingerbread, people and house are from the new cart, I stamped the sentiment with Peachy Keen Stamps, I did some doodling on the house with different colored markers to make it look like real candy. I drizzled on some white snow with this "Snow Writer" thing that I got from Michael's. I drew on their faces with a white marker since their faces were way too tiny to use my PK face stamps and these gingerbread people were both cut a 3 inches! I also added some stickles!

Be sure to come check out my Big Annoucement right HERE about my new Cricut Challenge blog Flaunt It Fridays.

Wednesday, November 24, 2010

I Have a New Challenge Blog!!

Hi everyone I am so sorry I have been M.I.A. for a while I just want to thank everyone who gave me blog awards over the past few days I will post those up tommorow.  I have been busy creating a BRAND NEW CHALLENGE BLOG called  Flaunt It Fridays. My partner who I have to give full credit for the gorgeous Blog Design and Blog Buttons is my very good friend Janis. We made this new challenge blog to basically "Flaunt" our Cricut Cartridges that we already own. We will have a new Cricut challenge every Friday starting Friday December 3rd. Please make sure you come check out the new blog it is very beautiful and I am very proud of our Design Team. We are having a Grand Opening GIVE AWAY on December 3rd, so be sure to come check out how to enter to win the Blog Candy. Here is a list of our wonderfully talented DT:

Sandra Co-Founder http://365daysofcricut.blogspot.com/

Janis Co-Founder http://pausedreamenjoy.blogspot.com/
Theresa http://www.thescrapbookingqueen.com/
Amanda http://www.myscrappinobsession.com/
Christina http://cardcreationsbyc.blogspot.com/
Stephanie http://www.alwayscrafting.com/
Jess http://myscrapdiary-jess.blogspot.com/
Ruthie http://septemberninth.blogspot.com/
Dorcas http://4craftyangels.blogspot.com/
Laurel http://www.blog.littlepeaceofmyheart.com/
Raven Sponsor Coordinator http://love4stamps.blogspot.com/

Here is our beautiful blog buttons that we have created for you to post on your blogs and Facebook, etc.


Tuesday, November 23, 2010

#189 Digi Elf Card

Hello Ladies!! Here's another card I made with a Digi from Digital delights by Louby Lou. The cutie pie Elf Girl is a digi. I colored her with Ms Pencils, added Pink Stickles to her bows, hat and shoes. I stamped the sent. multiple times and made it into a  border. The border on the bottom is a new MS Christmas punch. I used the negative snowlakes on top. The circle is from Plantin schoolbook. I also added a pink bow and put pop dots under the girl.

Please check back later for some very important announcments! Have a great day!
Here are the challenges I am entering:
Paper Cutz CHRISTMAS & BLING (my bling is Stickles)
Creative Cottage CHRISTMAS SOMEONE SPECIAL (I think elves are special!)
Digi Stamps 4 Joy INSPIRED BY CHRISTMAS/HOLIDAY SEASON

Monday, November 22, 2010

Blog Hop Winner and a Christmas Card

***This is my 2nd Post Click HERE to see my Straight From The Nest Card***
Close up of the snow...white fuzzy flock.

Hello everyone! I hope you are having a beautiful Fall Day. I am because i have some very exciting new for you I will probably share it with you tommorow so be sure to check back. First of all I would really like to thank all of you who came by my blog to check out my 1st Ever Mini Album for the My Thanksgiving Blessings hope hosted by the talented Kassidy. Thank you Kassidy for letting me be on your Fall Design Team. I had so much fun reading all of your comments you ladies are a riot! I 'm glad to hear that I am not the only one with a Crazy Pet LOL! My RANDOM WINNER is.......SHEREE!!! Congrats SHEREE....you Said....
Your mini is absolutely gorgeous! I have wondered if the distress tool is hard to use. I am sick...because I had about 40 coasters...did not know what to do with them and threw them away! Darn! Now, here I am, 75 miles from te nearest craft store...

I have four dogs who are always where I am...I finally had to get a futon bed for the craft room so I could craft...and they could have the bed so I would not trip! It is amazing how our animals run our lives...I cannot imagine what I would do without mine!
I hope you have a great Turkey Day and I would love to win your mini album kit!

Sheree...Please contact me with your address so I can get that out for you right away, my email is critterbugg365@gmail.com. Now onto my project:

This very adorable Digi is from Digital Delights By Louby Lou I just have to say, I never knew what the big deal was with coloring digis but I am really hooked. Yes I have been neglecting my Cricut a bit, but sometimes I feel the need to mix it up a bit. If you have never experimented with a digi go to their  website they have FREEBIES for you to try out =)    I colored with Bic Markers from Walmart, I drew teardops because he looks so sad, I stamped the sent., use a Fiskars punch for the small snowlakes, and my MS Drippy goo punch for the blue border, I put white fuzzy flock on the snow. I am entering in a few challenges here:

Always crafting My friend Stephanie has a great group of ladies showing us different coloring techniques. COLORING
Totally Paper Crafts SNOW & SNOWFLAKES
Paper Play Challenges LET IT SNOW
Meredith Scraps Christmas
Delightful Challenges BABY IT'S COLD OUTSIDE

#188 Straight from The Nest Thank You

Hello everyone and good morning! Today is Monday so that means there is a new challenge at Paper Playtime. Our theme this week is "Thank You", so I decided to use one of my new carts which is Straight From The Nest, I got it a great deal and I love it. It is very pretty like Cindy Loo. This is my first Gypsy-less card in a while my battery went dead and I sent it in on Thursday so I am anxiously waiting for my brand new one to come in I am so glad they are replacing it. On to my card now LOL!

I cut the sweet little owl and this beautiful tree, and also the grassy hills all from Straight From The Nest. The patterned paper is actually Christmas paper believe it or not! I stamped the sent. and used a MS border punch for the heart border, I added some green fibers to look like grass and put a pop dot underneath the tree.

This week we are sponsered by the wonderful images of Digital delights By Louby Lou, the winner this week will receive a $10 Gift Certificate to their shop. Have fun creating and make sure to make a "Thank You" project for Paper Playtime.

Saturday, November 20, 2010

My Thanksgiving Blessings Blog Hop Mini Album

Welcome to 365 Days Of Cricut and the MY THANKSGIVING BLESSINGS Blog Hop! If you've come from visiting Susan at Its me Susan P, you're in the right place!


If you've just happened across my blog and would like to play along with our fun hop, you can go to INKING IT UP CRAZY and start at the beginning. Go to Inking it Up Crazy.

The theme of this blog hop is MY THANKSGIVING BLESSINGS. Each blog has created a project centered around the blessings they have had this past year. Be sure to visit each blog for inspiration and fun BLOG CANDY.

***Warning Picture Heavy***
I decided to make 1st EVER mini album for our hop, I am going to put up to 8 pics of my son and I, I am going to put pics of us and our pumpkins pre-carved since this is not a Halloween album, Thanksgiving pics, Thanksgiving food pics Yum! Also, I will take a pic of us in our front yard next to our tree once the leaves turn red.  I named my album "Autumn Blessings" I have been wanting to make a mini for years but I have been so chicken to make one, I don't know why I just thought they were very intimidating, then about 6 weeks ago I saw all of these 4x4 inch Coaster sets on clearance at Michael's for only .20 cents! I thought I can do it, so I did. I am extremely happy with the end result, I love it so much I can't stop looking at it, and of course my 3 year old son loves it, he thinks it's his and he keeps saying "Wow" "Wow' "Wow"! I love him so much he is my #1 fan! I cheated on my Cricut and did this entire mini WITHOUT MY CRICUT!! I know I feel so Guilty LOL!!

Page 1: I stamped 2 images and I embossed one with gold embossing powder, the flowers are Recollections and Primas, the leaf is from the jewlery section at Michaels, the small yellow butterfly charm is a cell phone charm that I bought from ebay. "Autumn" is a brad. "Blessings" is a metal embellishment from Michael's I added pearls to it.


Lots and Lots of ribbon, just the way I invisioned my 1st mini! I know it may seem messy, but I love it so much  and I am obsessed with ribbon, so I got to use a lot of my stash!

On every page I used my Zutter Distrezz it all to destress the sides and I inked all of the edges with Walnut Stain and Frayed Burlap Distress ink. Love them!

I thought this view was just stunning! You can see the top page and also my distress work.
Page 2 and 3: Left side I put cute scarecrow ribbon and Glimmer Mist. Right side glimmer mist, cut paisley shape from patterned paper, flowers, sticker and pearls....oooh la la I love pearls and all things girly!
 Page 4 and 5: Left page I stamped mesh background stamp, put red yard on the side, cut the scarecrow from my paper stack adhered to cereal box to make a tag, added a flower eyelet with my Crop a dile. Right side put a sticker and something from a fake flower bouqet from the $1 store
 Continuing....Left side I sprayed the flower w/ Glimmer mist added a very large gem, stamped the leaf and added ink to my tag.
 Page 6 and 7: Left side sprayed 2 colors of Glimmer Mist and added a Sticker. Right side Did some stampinkg, added ribbon and plenty of turkey and leaf stickers, also added a flower and brad. I made that leaf charm.
 Close up of my handmade charm. It's a Tim Holtz tag/charm from Michael's added twine, cut the leaf from patt. paper and glued together with Glossy Accents.
 Page 8 and 9: I didn't do too much here because i wanted to put a large pic on the left side. I just added a flower, pearl and ribbon. The Turkey paper  was in my paper stack.
 Page 10 and 11: Left side sprayed with 3 colors of Glimmer mist (my only3), the border with the leaves and acorns are a piece of ribbon. Right side is just stickers. For this page I plan on puttig a pic of our Thanksgiving meal.

Page 12 and 13: Left side is a pumpkin ribbon, plan on putting our pic here with out pumpkins, Right side is a silk flower also from the $1 store inked it up, added a cloth thype brad, pumpkin sticker, journaling tag, ribbon and another embellishment that I made with  a cereal box. I just put paper that says "Pick Your Own Pumpkin" inked it and on the back put pumpkin stickers...see below
 Here's my embellishmet and plus you can see the pretty ribbon and the pretty leaf paper.
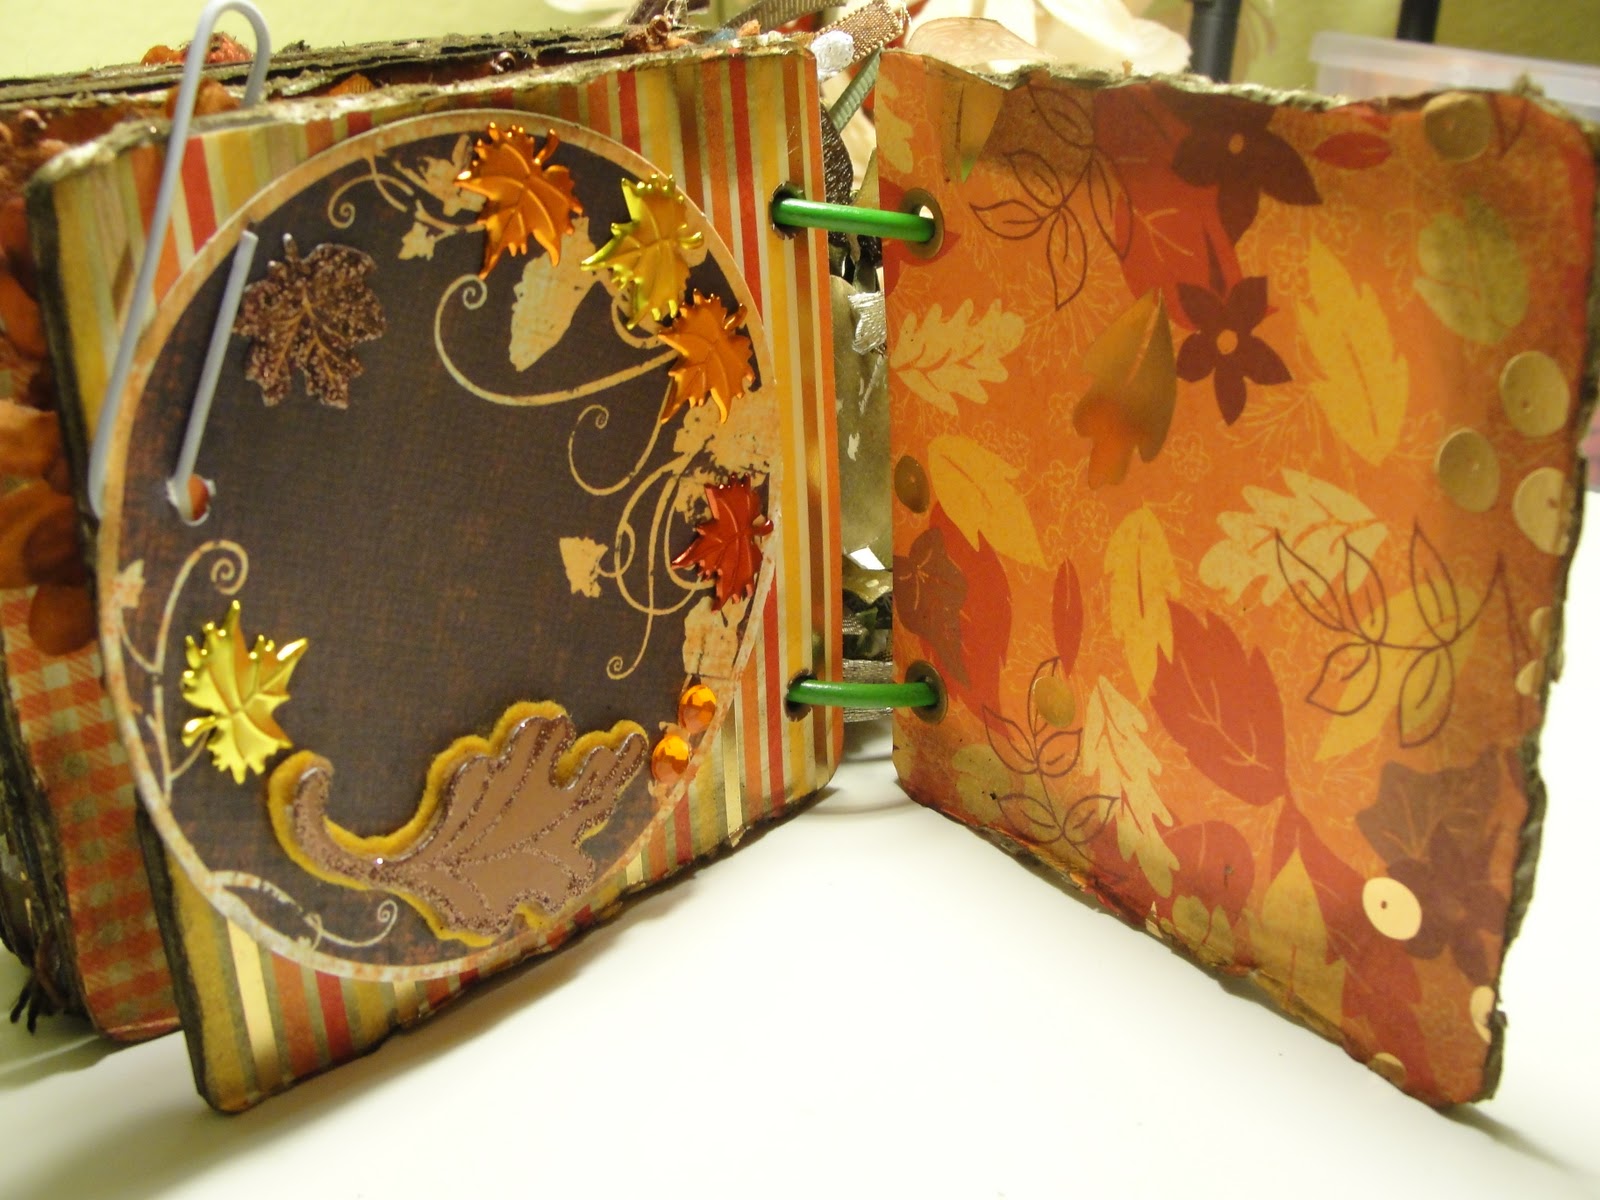
Page 14 and 15: Left side added a paper clip, a circle punch out shape from my Mind's eye (I bought at a LSS) it's a sheet of paper with die cut punch outs. I put 2 leaf stickers, bling and leaf brads which I love. I plan on doing my journaling on the circle. Right side I left plain so i can put a pic.
 Here's what it looks like when you swivel it open. I can add a bonus pic here behind the circle.
Page 16 last page: This was also an easy page just cut it out from my patt. paper stack ready to go! I also did more inking here. and you can also see wha the ribbons look like from the back side.
 BLOG CANDY!!! Yep, I decided to make a mini album kit for one lucky winner!! I tried to give you everything that I used to make the mini, but some items I did not have duplicates of. You will recieve one 8 piece THICK chipboard coaster set, 2 large binder rings, pretty  paper from the Autum Splendor Stack (Michael's), so much ribbon for you, brads, flowers, all the charms I used. If you win and you decided to make this mini I would love to see your version of my mini, have fun creating!
Theresa- http://www.juicycricutcards.blogspot.com/
Jenny- http://www.crazyaboutcricut.blogspot.com/
Celeste- http://www.ccscards.blogspot.com/
Raven- http://www.love4stamps.blogspot.com/
Rebecca- http://www.creationswithbecka.blogspot.com/
Debbie- http://www.craftydeb-ddscrafts.blogspot.com/
Sherri- http://www.sherrisspace.blogspot.com/
Susan- http://www.itsmesusanp.blogspot.com/
Sandra- http://www.365daysofcricut.blogspot.com/  ---You Are Here---
Kathy- http://www.kathyand3kids.blogspot.com/ 


I guess I am not the only one who is obsessed with my Cuttlebug! My dog Boots was just passed out asleep laying there in my Cuttlebug drawer, yep I have a 12x12 drawer full of embossing folders! I highly recommend Cuttlebug folders to be a dog pillow LOL! Too funny!

To win this awesome mini album KIT  that I have created for you to make all you have to do is leave me a comment here and tell me what you have caught your dog/cat doing in your creative space! You do not need to be a follower, but I do really love all of my current and all new followers are welcome here! Please like me on Facebook so we can stay connected there also! I will choose a random winner on Monday November 22nd. Have a great time hoping now on to Kathy.

Monday, November 15, 2010

#187 Chocolate Cake Card


Here's my chocolate cake card that I made inspired by my birthday cake from The Cheesecake Factory mmmm! The chocolate cake cut is from From My Kitchen and the whipped cream topping is a cloud from Give a Hoot. I embossed the cake with my Cuttlebug and I put Glossy Accents on the cake to make it look like frosting mmmm! Can you tell that I am craving this chocolate cake from the Cheesecake Factory! I put a pop dot under the whipped cream, stamped the sentiment and used my i-rock to add the bling. I am entering in these challenges:
My Creative Time Food/ From My Kitchen


Paper Playtime P.S. I Love You

Click HERE to see my Robot card that I posted late last night!


Hi everyone I hope you all had an amazing weekend I did because I got to go to the beach on Saturday with my son. It was a perfect warm November day here in California. I couldn't believe how warm the water was. It's funny because the weather was too cold during the summer and the water here is always freezing. So going to the beach in November sounds crazy huh! and  Warm water? What's going on here?

For those of you who are new to my blog welcome and thank you to all of my followers I apprecitate all of you!! I am a Queen/Designer at Paper Playtime and we have amazing challenges every week. This week we are sponsored by Robyn's Fetish with these very cute Christmas Digi's. We are not just a digi challenge, you can make anything you want with the  P.S. I Love You theme. I was going to make a layout with that title but I was so busy this weekend, I think I will still make it and post later in the week.

Card #1 I colored my snowman with MS pencils, drew th outline with a Sharpie to make it darker, put stickles where I did the coloring. I did faux stitching , Glimmer Mist, stamped sentiment and added pop dots underneath the snowman.
Card #2  I colored with MS pencils, added Stickles, fibers and MS border punch.
Card #3 Colored with MS pencils, colored faux snow with a white marker, added Stickles to snow, and put white MS glitter on the big pile of snow, stamped sentiment and added bling with my i-rock.

Be sure to give some blog love to the other Queens at Paper Playtime and enter the P.S. I Love You Challenge!

Sunday, November 14, 2010

#186 Easy Robot B-day Card

Hi everyone! Here's an easy robot B-day card that I made from the Birthday Cakes cartridge. I own the Robotz cart but I guess I get scared of carts that have so many tiny layers. This robot only had 2 layers, I chalked him up to make him look like a dirty metal tool LOL! I stamped the background circle stamps, gears and sentiment. I embossed the blue paper with the Robotz Cuttlebug Companion Folder.

Saturday, November 13, 2010

#185 5 Minute Card Here

Hi everyone I hope you ladies are having a fabulous Saturday. Here's a very simple card that only took me 5 minutes! Yep you heard me 5 minutes! This is going to be my go to card recipe when I'm in a hurry. I stamped the tree, snowflake and sentiment, then I put the entire front of my card in my cuttlebug and embossed with my snowflake folder. I then stamped the doll and cut her out and put a pop dot underneath her. I added some red stickles and some Christmas ribbon. I am entering in two challenges:
Paper Sundaes Let it Snow
For fun Challenges Dry embossing

Friday, November 12, 2010

#184 I have so much JOY!!

***This is my 2nd post today click HERE to see my Thanksgiving Layout!***

Happy Friday everyone! I have so much JOY because I finally got 3 Birds on Parade I have been wanting it for months and months I am so happy and impressed with this cart it's so adorable! So I will be having a 3 Birds Marathon LOL! I got this pretty pastel Christmas paper at Michael's it's the new DCVW 180 stack, I brought my Joann's ad so they priced matched it for me at $9.99!!

I cut this cute bird from 3 Birds on Parade, stamped the face with PK stamps, added stickles to the hat, scarf, and shoes/socks. I cut the scallop circle from Accent Essentials then I embossed with my Cuttlebug. I added some ribbon and stamped the sentiment. Here is a list of the challenges I am entering:

The Crazy Challenge Things with wings (my bird!)
Fresh Brewed 2 or more patterned papers (I used 3!)

Thursday, November 11, 2010

#183 Thanksgiving Layout


Hello everyone! I decided to try something new and make a Pre-made Thanksgiving Layout for this year, originally I was going to make it for the Crafting With Christina Challenge but it was too late. Luckily I was just in time for the new Frosted Designs challenge which is to include the word "Thanks" in it. For my title I got it from Lyrical Letters and also the marquee. The turkey and swirl are from Celebrate with Flourish, and the leaves are from Speaking of Fall (That's a great Fall cart BTW). I punched the border with a MS punch and added glitter to the leaves, Stickles to the turkey, pinecone and sentiment. I also added a light spritz of Glimmer Mist to the marquee because I thought it needed something more. I had fun making a pre-made page I kind of thought I was cheating LOL! I think I will start making these more often since I keep forgetting to get pics printed at Walgreen's. Be sure to check out my Facebook Fan page if you are a "Fan" of my work! I will be featuring other blogs on it along with amazing scrapbooking deals. Have a great day!

Monday, November 8, 2010

#181 & #182 Rocker Cards


Good morning everyone! I hope you guys are all having a rockin' day! For those who are new at my blog Welcome! Also I am on a DT called  Paper Playtime and our fabulous theme is YOU ROCK!! I love this them so much because I have been wanting to use my Rock Princess cart more often. We were sponsored with these very cute digi's from The Stamping Boutique be sure to check them out, they will also be giving the winner 5 Digi's of their choice. Now for my cards, for the first one I did some stamping, I cut the tag from Once Upon A Princess, the girl is from Rock Princess (I forgot a layer opps!) I stamped a star on her shirt and added Stickles, I embossed the background with my Cuttlebug Comapion Robotz folder, that was awesome that I was able to use a Robot themed folder for this card!Doesn't the girl remind you of Gwen Stefani back in the 90's in her No Doubt days!?! I love her!

For my 2nd card,  I embossed the background with my Cuttlebug, then I sanded it down to expose the white core. The flag with the birds are from Rock Princess and I stamped the sentiment. These digi's are from The Stamping Boutique I colored them with MS pencil's cut them out and put a pop dot underneath them. I made this card to send it to my hubby I was thinking that was him because he likes singing and playing Guitar Hero,  and I like wearing pink, and wearing a lot of accessories!

Saturday, November 6, 2010

#180 Season's Greeting's card, and '80's BLOG HOP WINNER HERE!

Hi everyone!! I hope you guys are having a great weekend! I am because I am super excited that I just made a Facebook Fan Page for my 365 Days Of Cricut Blog. I hope you guys can be a fan of my work, I will be posting all kinds of updates on there including new projects, blog hops, I will even be featuring and promoting other blogs on my site, and most importantly SHOPPING!! Yep! I will tell you all about my newest and lastest shopping sprees and great scrapbooking deals that I find LOL! If you would like to "LIKE" me on Facebook please click on the link on the upper right side.

My other great news is that I have a winner that was Randomly chosen for the I Love The 80's Blog Hop which is......Cathy....she said Totally awesome boombox! I love the card and the colors that you used! I'm a new follower... love your work.***Congrats Cathy!*** Please contact me critterbugg365@gmail.com with all of your info so I can send you your prize thank you ladies for all of your sweet and encouraging comments. And I would really like to thank the genius mastermind of this very fun and funky 80's hop Raven it was in celebration of her birthday! Thank you very much Raven for letting me be in your hop!

Lastly I would like to tell you guys all about my ONE (lol!) of my newest cartridges which is the Christmas Cards seasonal cart, I love it! You can make so many different cards and it's all figured out for you easy! Sometimes I don't want to do a lot of thinking and planning when I make cards so for people who love Wild Card or Just Because Cards this cart would be for you! I cut every single thing on here from Christmas Cards, I did a lot of embossing with my green bug the Cuttlebug, did some inking, and added stickles, I also stamped the sentiment and painted the tree with Acyrlic paint and added a crackle topping to it, but it didn't work. I will keep experimenting with the Acrylic paints and Crackle medium. It was a Crackle medium that I found in the paint section at Michael's. I am entering in Momo's embossing challenge.  Also, entering in the Cricut Cardz Christmas card challenge make something with an "S" I chose Sleigh, Snowflakes and Stickles!! Also, there's another challenge out there called Crafty Calendar Challenge and their theme is Winter with Snowlakes.

Once again if you "Like" me on Facebook that would make me really really super happy and excited! Have a great night =)
Sandra

Friday, November 5, 2010

#179 Santa's Elf Layout

Good evening everyone! I feel like I haven't done a layout in forever. Here's a layout I did of my son when he was exactly 2 months old back in '07 I can't believe it was that long ago! I feel like I went all out on this page it took me hours but worth it I love the way it came out. I was inspired by his little outfit that says "Santa's Little Elf" I stamped the sentiment and added stickles to it, I stamped the vintage Santa on the upper right, I stamped the flourishes and also the "Christmas Memories" sentiment, I also stamped the face with a PK stamp on the doll from Paper Doll Dress Up. The present border was from Winter Frolic I also added stickles to them, I did some hand stitching under the presents and also used my punches for the 2 borders. The snowflake border on the bottom is from patterned paper. The scallop oval that I embossed and inked with my cuttlebug is from ACY, the circle scallop where my son's pic is is from AE. I also did some inking with my Fired Brick distress ink around the page.

#178 Simple guy Card

Hi everyone Happy Friday!! Here's a simple guy card that I made to send to my husband I am really counting down the days until he comes home, so far we are half way there. I have never used my Nursery Rhymes cart for the images, just the font. So last night I decided to finally break it in and I love the outcome! I am also entering into the Crafty Creations challenge which is Fairy Tales! Yep it is truly a fairy tale story of how me and me hubby met, it was love at first sight! We met Feb. 2nd, 2003 and got married 1 year later. I married my love when I was only 20 years old and we are still madly in love! Just like the fairy tale the dish ran away with the spoon I am the dish LOL! I stamped the faces with PK stamps, cut the tag from Fabulous Finds and stamped the sentiment, added brads and ribbon. It is really hard for me not to go all out on my cards, I thought this card was really plain and simple, but then I remembered it is a guy card! They don't want glitter and bling LOL! Take care and have a great day!

My Highest Viewed Video

 Please come and support my YouTube channel and watch my highest viewed viewed video and subscribe! https://youtube.com/shorts/4gZ1h0N7sP8?f...